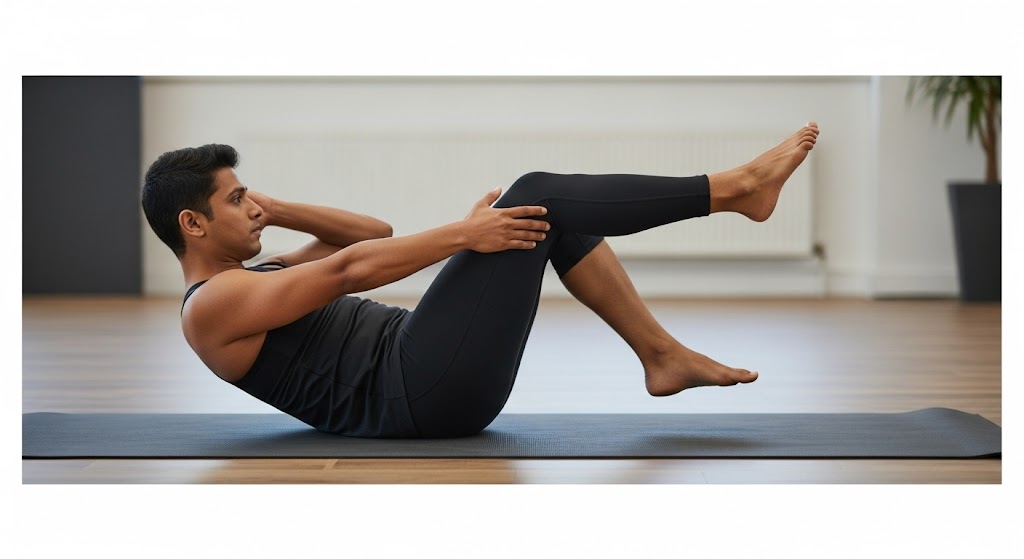
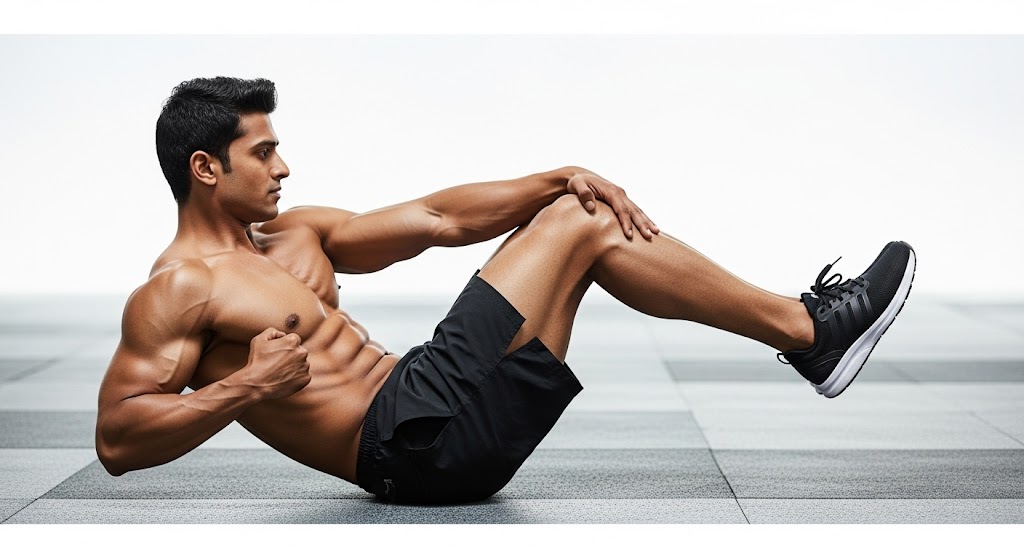
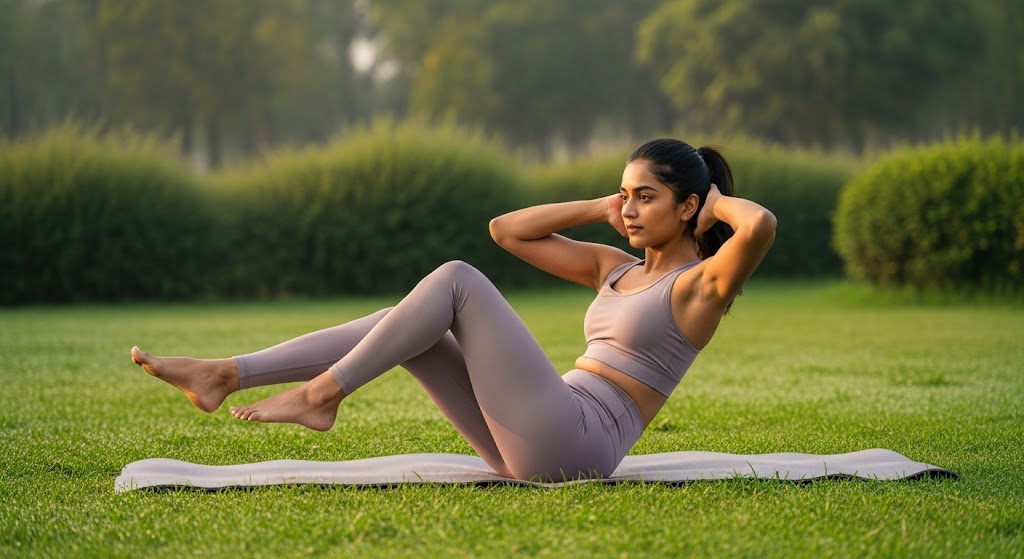
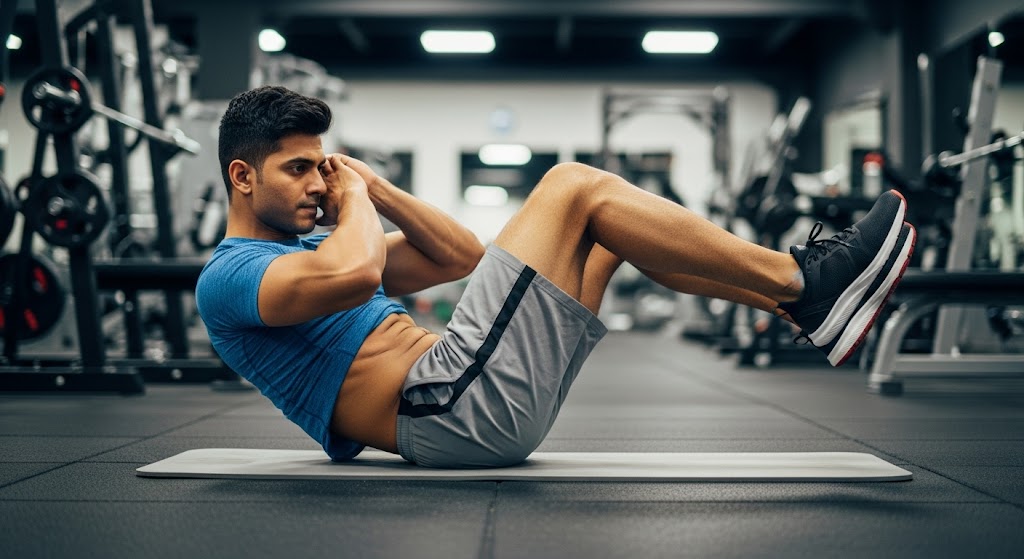
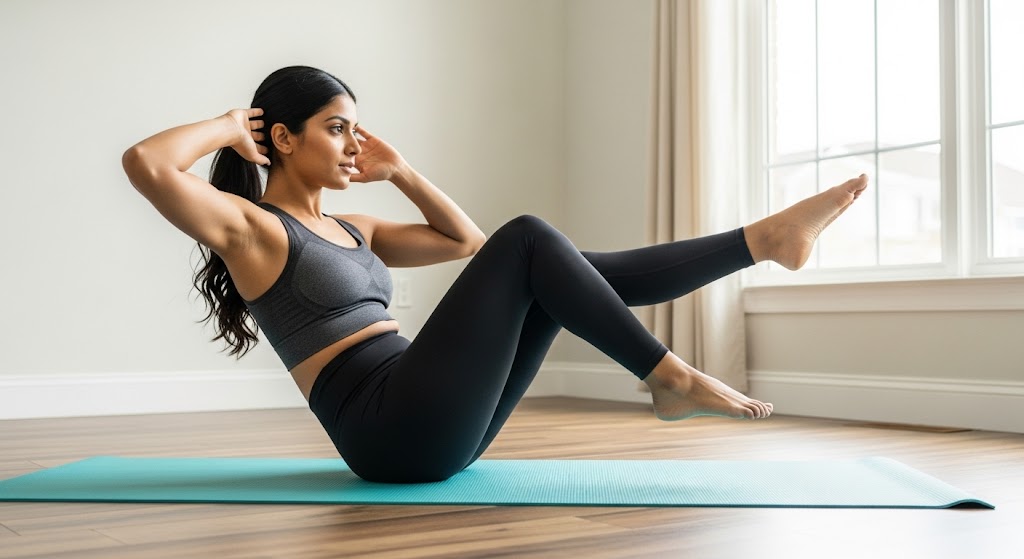
Key steps for how to do bicycle crunches are: Lie flat on back, hands behind head, lift shoulders off ground, bring right elbow to left knee while extending right leg, switch sides in cycling motion, keep core engaged, breathe steadily, and maintain controlled movement throughout the exercise.
Want to master how to do bicycle crunches for incredible core strength and defined abs? This dynamic exercise targets multiple abdominal muscles simultaneously while improving coordination and burning calories effectively. Learning how to do bicycle crunches properly transforms your core workout routine and delivers impressive results for both beginners and advanced fitness enthusiasts.
Table of Contents
What Are Bicycle Crunches?
Bicycle crunches are a dynamic core exercise that combines the twisting motion of oblique crunches with the leg movement of cycling. This compound movement targets the rectus abdominis, obliques, and hip flexors simultaneously, making it one of the most effective abdominal exercises for complete core development and functional strength.
The exercise gets its name from the pedaling motion that mimics riding a bicycle while lying on your back. Understanding how to do bicycle crunches correctly involves coordinating upper body rotation with alternating leg movements, creating a challenging workout that engages multiple muscle groups while improving core stability and endurance.
Dive into the facts with does jumping jacks reduce belly fat to find out how they fit into your fat-loss strategy.
How to Do Bicycle Crunches Step by Step?
Learning how to do bicycle crunches requires mastering the proper setup, movement pattern, and coordination between upper and lower body actions. Follow these detailed steps for safe and effective execution.
| Step | Action | Key Points | Common Error | Duration |
|---|---|---|---|---|
| 1 | Starting Position | Lie flat, hands behind head | Don’t pull on neck | Hold |
| 2 | Initial Lift | Lift shoulders off ground | Keep lower back down | 2 seconds |
| 3 | First Crunch | Bring right elbow to left knee | Touch elbow to knee | 1 second |
| 4 | Leg Extension | Extend right leg straight out | Keep leg hovering | 1 second |
| 5 | Switch Sides | Alternate to left elbow, right knee | Smooth transition | 1 second |
| 6 | Continuous Motion | Maintain cycling pattern | Control the tempo | Ongoing |
| 7 | Breathing | Exhale on crunch, inhale on switch | Don’t hold breath | Rhythmic |
| 8 | Completion | Lower to starting position | Control the descent | 2 seconds |
Curious about your burn rate? Find out in 30 minute cardio calories burned.
Step 1: Starting Position Setup
What to Do: Lie flat on your back on a comfortable surface with your knees bent at 90 degrees and feet lifted off the ground. Place your hands lightly behind your head with fingers interlaced, elbows wide.
Key Focus Points:
- Keep your lower back pressed against the floor
- Position hands behind head without interlocking fingers tightly
- Engage your core muscles before beginning movement
- Ensure neck remains in neutral position throughout
Step 2: Initial Shoulder Lift
What to Do: Gently lift your shoulders and upper back off the ground by contracting your abdominal muscles. Keep your lower back firmly pressed against the floor.
Key Focus Points:
- Use your core muscles, not your hands, to lift shoulders
- Maintain gap between chin and chest to protect neck
- Keep the movement small and controlled
- Feel the engagement in your upper abdominals
Step 3: First Crunch Movement
What to Do: Bring your right elbow toward your left knee while simultaneously bringing your left knee toward your right elbow. Aim to create a “crunch” by bringing these two points together.
Key Focus Points:
- Focus on bringing elbow to knee, not just twisting
- Keep the opposite leg extended and hovering above ground
- Maintain shoulder lift throughout the movement
- Feel the contraction in your oblique muscles
Step 4: Leg Extension Control
What to Do: As you bring one knee toward the opposite elbow, extend the other leg straight out, keeping it hovering 6 inches above the ground. This creates the “bicycle” motion.
Key Focus Points:
- Keep extended leg straight and controlled
- Maintain constant tension by not letting leg touch ground
- Use your core to control leg movement
- Keep hips stable and avoid rocking
Step 5: Smooth Side Switching
What to Do: Smoothly transition by switching sides – bring your left elbow toward your right knee while extending your left leg and bringing your right knee in.
Key Focus Points:
- Make transitions fluid, not jerky or rushed
- Maintain shoulder lift throughout the switch
- Keep core engaged during the transition
- Focus on quality over speed of movement
Step 6: Continuous Cycling Motion
What to Do: Continue alternating sides in a smooth, controlled cycling pattern. Each side should receive equal work and attention.
Key Focus Points:
- Maintain consistent tempo throughout set
- Keep movements controlled and deliberate
- Focus on muscle contraction rather than speed
- Count repetitions on each side equally
Step 7: Proper Breathing Pattern
What to Do: Exhale during the crunch phase when bringing elbow to knee, and inhale during the transition or extension phase.
Key Focus Points:
- Coordinate breathing with movement for better core activation
- Never hold your breath during the exercise
- Use breathing to help maintain rhythm
- Deep exhales help engage core muscles more effectively
Step 8: Controlled Completion
What to Do: When finishing your set, slowly lower your shoulders back to the starting position with control. Lower your feet to the ground gently.
Key Focus Points:
- Avoid dropping shoulders or legs suddenly
- Maintain core engagement until fully lowered
- Take a moment to rest before next set
- Stretch your core muscles after completing exercise
Discover how many calories you can actually burn with calories burned from pull ups.
Proper Setup for Bicycle Crunches
Creating the correct starting position ensures effective muscle activation and prevents injury during bicycle crunch execution. Your setup determines the quality of every repetition performed.
Lie flat on your back with knees bent at 90 degrees and feet lifted off the ground. Place hands lightly behind your head with fingers interlaced, avoiding pulling on your neck. Engage your core muscles and lift your shoulder blades slightly off the ground to create tension in your abdominal muscles.
Movement Execution for Bicycle Crunches
The cycling motion requires precise coordination between your upper body rotation and leg movements. Focus on controlled movements rather than speed to maximize muscle activation and prevent momentum from taking over.
Bring your right elbow toward your left knee while simultaneously extending your right leg straight out, hovering above the ground. Immediately switch sides, bringing your left elbow to your right knee while extending your left leg. Continue this alternating pattern while maintaining constant tension in your core muscles.
Separate myth from reality and learn the facts with does pull ups increase height.
Benefits of Bicycle Crunches
Bicycle crunches offer numerous advantages that make them essential for any core training program. These benefits extend beyond simple muscle building to include functional strength improvements that enhance daily activities and athletic performance.
- Complete Core Activation: Targets rectus abdominis, obliques, and deep core muscles simultaneously for comprehensive abdominal development
- Improved Coordination: Enhances neuromuscular control through complex movement patterns that challenge balance and stability
- Enhanced Calorie Burn: Dynamic movement patterns increase metabolic demand compared to static core exercises
- Functional Strength: Develops rotational power and stability needed for sports and daily activities
- No Equipment Required: Bodyweight exercise that can be performed anywhere without special equipment or gym access
- Progressive Difficulty: Easily modified for different fitness levels through speed, duration, and range of motion adjustments
- Posture Improvement: Strengthens core muscles that support proper spinal alignment and reduce back pain
- Athletic Performance: Builds the rotational strength essential for sports involving twisting movements
For those interested in comprehensive core training, exploring bodyweight exercises for beginners provides excellent foundation movements that complement bicycle crunch training.
How to Do Bicycle Crunches Properly?
Proper form in bicycle crunches determines exercise effectiveness and injury prevention. Many people rush through the movement or use momentum, reducing muscle activation and potentially causing strain. Focusing on controlled movements and proper alignment maximizes results while maintaining safety.
The key to executing how to do bicycle crunches properly lies in maintaining constant core tension while coordinating upper and lower body movements. Your shoulders should remain lifted throughout the exercise, never completely relaxing between repetitions. Keep your extended leg hovering approximately 15-30 cm above the ground to maintain tension in your hip flexors and lower abdominals.
Avoid common mistakes such as pulling on your neck, allowing your shoulders to drop to the ground, or moving too quickly through the range of motion. Quality repetitions with perfect form provide superior results compared to high-speed, sloppy movements that rely on momentum rather than muscle activation.
For additional core strengthening techniques, how to do plank exercise provides complementary isometric training that enhances overall core stability.
How to Breathe When Doing Bicycle Crunches?
Proper breathing technique during bicycle crunches enhances performance, prevents fatigue, and maintains core stability throughout the exercise. Many people hold their breath during core exercises, which reduces oxygen delivery and limits endurance.
- Exhale During Crunch: Breathe out forcefully as you bring your elbow toward your knee to engage deep core muscles
- Inhale During Transition: Take a quick breath in as you switch sides to maintain oxygen flow and rhythm
- Maintain Steady Rhythm: Coordinate breathing with movement pattern rather than holding your breath throughout the set
- Use Diaphragmatic Breathing: Breathe deeply from your diaphragm rather than shallow chest breathing for better core engagement
- Don’t Hold Breath: Continuous breathing prevents internal pressure buildup that can cause dizziness or strain
- Practice Breathing Pattern: Start slowly to establish the breathing rhythm before increasing exercise speed or intensity
Common Mistakes in Bicycle Crunches
Avoiding these common errors ensures you get maximum benefits from learning how to do bicycle crunches while preventing injury and maintaining proper form throughout your workout sessions.
- Pulling on Neck: Using hands to yank your head forward creates neck strain and reduces core muscle activation
- Moving Too Fast: Rushing through repetitions reduces muscle tension and relies on momentum instead of strength
- Dropping Shoulders: Allowing shoulders to touch the ground between reps eliminates constant tension needed for muscle development
- Incomplete Range: Not bringing elbow fully to knee or failing to extend leg completely limits muscle activation
- Holding Breath: Breath holding reduces endurance and can cause dizziness during longer sets
- Arching Back: Allowing lower back to lift off ground reduces core engagement and may cause back strain
- Passive Legs: Letting legs move without resistance reduces hip flexor and lower abdominal activation
- Inconsistent Tempo: Varying speed randomly prevents establishing proper rhythm and muscle memory
Bicycle Crunch Variations
These variations modify the basic bicycle crunch movement to target different muscle groups, adjust difficulty levels, and prevent workout monotony. Choose variations based on your fitness level and specific training goals.
| Variation | Difficulty | Primary Focus | Equipment | Modification |
|---|---|---|---|---|
| Slow Bicycle | Intermediate | Time under tension | None | 3-second holds |
| Reverse Bicycle | Intermediate | Lower abs | None | Legs toward chest |
| Weighted Bicycle | Advanced | Increased resistance | Medicine ball | Hold weight |
| Single-Leg Bicycle | Beginner | Learning pattern | None | One leg stationary |
| Elevated Bicycle | Advanced | Extended range | Bench | Shoulders elevated |
| Pulse Bicycle | Intermediate | Endurance | None | Small pulse movements |
Detailed Variation Instructions
1. Slow Bicycle Crunches
Difficulty: Intermediate
Primary Focus: Time under tension and muscle control
Slow bicycle crunches emphasize controlled movement and extended muscle contraction, dramatically increasing the challenge without adding external weight. This variation builds exceptional core strength and teaches proper form through deliberate, precise movements that maximize muscle fiber recruitment and development.
How to Perform Slow Bicycle Crunches?
- Start in standard bicycle crunch position, then bring right elbow to left knee and hold for 3 full seconds
- Slowly transition to opposite side, taking 2 seconds to switch positions, then hold for 3 seconds
- Focus on maintaining constant muscle tension and perfect form throughout extended holds
- Complete 8-12 slow, controlled repetitions per side with emphasis on quality over quantity
Benefits: Enhanced muscle control, improved mind-muscle connection, increased strength endurance
Progression: Extend hold time to 5-7 seconds or add slight pulses during holds
2. Reverse Bicycle Crunches
Difficulty: Intermediate
Primary Focus: Lower abdominal development
Reverse bicycle crunches shift the movement emphasis by bringing knees toward elbows rather than elbows toward knees, creating greater lower abdominal activation. This variation targets the often-neglected lower portion of the rectus abdominis while maintaining oblique engagement through rotational movement patterns.
How to Perform Reverse Bicycle Crunches?
- Lie with hands behind head and shoulders slightly lifted, start with both knees bent at chest level
- Keep elbows stationary and wide while bringing left knee toward right elbow using core contraction
- Simultaneously extend right leg out while maintaining the knee-to-elbow connection on the working side
- Switch sides by bringing right knee to left elbow while extending left leg, keeping upper body stable
Benefits: Stronger lower abs, improved pelvic stability, balanced core development
Progression: Add ankle weights or resistance bands around feet for increased difficulty
3. Weighted Bicycle Crunches
Difficulty: Advanced
Primary Focus: Increased resistance and strength building
Weighted bicycle crunches add external resistance to challenge the core muscles beyond bodyweight limitations, promoting greater strength gains and muscle development. This advanced variation requires excellent form and coordination to safely manage the additional load while maintaining proper movement patterns.
How to Perform Weighted Bicycle Crunches?
- Hold medicine ball, weight plate, or dumbbell against chest with both hands throughout movement
- Perform standard bicycle crunch pattern while maintaining secure grip on weight
- Keep the weight close to body center and avoid letting it drift away from torso
- Focus on controlled movements as the added resistance will challenge stability and coordination significantly
Benefits: Increased muscle strength, progressive overload capability, enhanced core power
Progression: Gradually increase weight from 5-10 pounds up to 15-25 pounds as strength improves
4. Single-Leg Bicycle Crunches
Difficulty: Beginner
Primary Focus: Learning proper movement patterns
Single-leg bicycle crunches simplify the coordination requirements by keeping one leg stationary, allowing beginners to focus on proper form and core engagement. This variation teaches the fundamental movement pattern while reducing complexity, making it perfect for those new to bicycle crunches or recovering from injury.
How to Perform Single-Leg Bicycle Crunches?
- Start with right leg extended and stationary, left leg bent with knee at chest level
- Bring right elbow toward left knee while keeping right leg extended and hovering above ground
- Return to center, then bring left elbow toward left knee for oblique engagement on same side
- Complete all repetitions on one side before switching leg positions and repeating pattern
Benefits: Simplified learning curve, unilateral strength development, improved form focus
Progression: Graduate to alternating legs after mastering single-leg pattern, then full bicycle crunches
5. Elevated Bicycle Crunches
Difficulty: Advanced
Primary Focus: Extended range of motion and increased difficulty
Elevated bicycle crunches are performed with shoulders elevated on a bench or stability ball, increasing the range of motion and making the exercise significantly more challenging. This variation requires greater core strength and stability while providing enhanced muscle activation throughout a larger movement range.
How to Perform Elevated Bicycle Crunches?
- Lie with shoulders and upper back supported on bench edge, hips and legs extending off the bench
- Position hands behind head and lift knees to 90-degree position to start
- Perform bicycle crunch movement with increased range of motion due to elevated starting position
- Focus on controlled movements as the unstable position will challenge core stability significantly
Benefits: Increased range of motion, enhanced core activation, improved stability and balance
Progression: Use unstable surface like exercise ball instead of bench for additional challenge
6. Pulse Bicycle Crunches
Difficulty: Intermediate
Primary Focus: Muscular endurance and sustained contraction
Pulse bicycle crunches incorporate small, rapid pulsing movements within the traditional bicycle crunch pattern, dramatically increasing muscular endurance demands. This variation builds exceptional core stamina while maintaining constant muscle tension through continuous micro-movements that challenge muscle fibers differently than standard repetitions.
How to Perform Pulse Bicycle Crunches?
- Assume bicycle crunch position and bring right elbow toward left knee as normal
- Instead of fully releasing, pulse elbow toward knee 3-5 times with small, rapid movements
- Switch to opposite side and repeat pulsing pattern before continuing with alternating sequence
- Maintain constant core tension throughout pulsing movements without relaxing between pulses
Benefits: Enhanced muscular endurance, improved muscle definition, increased metabolic demand
Progression: Increase pulse count to 8-10 per side or combine with weighted variation
Nail your form and maximize results with how to do a perfect squat
Muscles Worked in Bicycle Crunches
Understanding which muscles are activated during bicycle crunches helps optimize your training and create balanced workout programs. This exercise targets multiple muscle groups simultaneously for comprehensive core development.
| Muscle Group | Primary/Secondary | Function | Development Benefit |
|---|---|---|---|
| Rectus Abdominis | Primary | Trunk flexion | Six-pack definition |
| External Obliques | Primary | Trunk rotation | Side core strength |
| Internal Obliques | Primary | Trunk rotation | Deep core stability |
| Hip Flexors | Secondary | Leg lifting | Hip mobility |
| Transverse Abdominis | Secondary | Core stabilization | Deep core strength |
| Serratus Anterior | Secondary | Shoulder stability | Upper core support |
How Many Bicycle Crunches Should You Do?
The optimal number of bicycle crunches depends on your fitness level, goals, and overall workout program. Beginners should focus on perfect form rather than high repetitions, starting with 2-3 sets of 10-15 repetitions per side. Quality movements with proper technique provide better results than high-repetition sets with poor form.
Advanced practitioners can perform 3-4 sets of 20-30 repetitions per side, focusing on controlled movement and maintaining tension throughout each set. Consider your bicycle crunch training as part of a comprehensive core program rather than an isolated exercise. Progressive overload applies to bicycle crunches through increased repetitions, longer hold times, or added resistance rather than simply increasing speed.
For context on calorie burning during core exercises, how many calories can you burn doing crunches provides insight into the metabolic benefits of abdominal training.
When to Include Bicycle Crunches in Your Workout?
Strategic timing of bicycle crunches within your workout maximizes effectiveness while preventing fatigue from interfering with other exercises. Consider your training goals and energy levels when programming this challenging core exercise.
- Post-Workout Core Finisher: Perform bicycle crunches at the end of your workout when your core is pre-fatigued for maximum challenge
- Warm-up Activation: Use lighter, controlled bicycle crunches to activate core muscles before heavy compound exercises
- Dedicated Core Days: Include bicycle crunches as a primary exercise on days focused specifically on abdominal training
- Circuit Training: Incorporate bicycle crunches into high-intensity circuits for combined strength and cardiovascular benefits
- Morning Routine: Start your day with bicycle crunches to activate your core and improve posture for daily activities
- Between Sets: Use bicycle crunches as active recovery between sets of other exercises to maintain workout intensity
Who Should Modify or Avoid Bicycle Crunches?
While bicycle crunches benefit most people, certain conditions require modifications or alternative exercises. Understanding limitations ensures safe and effective training for all fitness levels and physical conditions.
- Lower Back Issues: Those with herniated discs or chronic back pain should consult healthcare providers before performing bicycle crunches
- Neck Problems: Individuals with neck injuries should avoid placing hands behind head and use arms crossed over chest instead
- Hip Flexor Tightness: People with extremely tight hip flexors may need to start with knee raises before progressing to full bicycle crunches
- Pregnancy: Pregnant women should avoid lying flat on their back after the first trimester and choose standing core alternatives
- Recent Abdominal Surgery: Post-surgical patients need medical clearance before returning to core-intensive exercises like bicycle crunches
- Complete Beginners: Those new to exercise should master basic crunches and planks before attempting the complex coordination of bicycle crunches
For comprehensive core training alternatives, exploring basic calisthenics workout provides foundational exercises suitable for all fitness levels.
Bicycle Crunches vs Other Core Exercises
Comparing bicycle crunches to other popular abdominal exercises helps you understand their unique benefits and optimal applications within your training program. Understanding the differences between various core exercises helps create balanced training programs. For detailed comparisons, sit ups vs crunches provides comprehensive analysis of different abdominal exercises and their specific benefits.
Bicycle Crunches vs Regular Crunches
Bicycle crunches provide superior core activation compared to regular crunches due to their dynamic nature and involvement of oblique muscles. While regular crunches primarily target the rectus abdominis, bicycle crunches engage multiple core muscles simultaneously for more comprehensive development.
The rotational component of bicycle crunches better prepares your core for real-world movements that involve twisting and turning. Regular crunches remain valuable for learning basic core engagement, but bicycle crunches offer greater functional transfer to sports and daily activities.
Bicycle Crunches vs Planks
Planks excel at building isometric core strength and stability, while bicycle crunches develop dynamic movement patterns and rotational power. Both exercises complement each other in comprehensive core training programs, with planks building foundational stability and bicycle crunches adding movement-specific strength.
Consider your training goals when choosing between exercises. Planks better develop endurance and stability, while bicycle crunches improve power and coordination. Most effective programs include both exercises for complete core development.
Programming Bicycle Crunches for Different Goals
Your specific fitness goals determine how to integrate bicycle crunches into your training program. Different objectives require varying approaches to sets, repetitions, and training frequency.
Fat Loss and Definition
For fat loss and muscle definition, incorporate bicycle crunches into high-intensity circuit training or as finishers after cardio sessions. Perform 3-4 sets of 20-30 repetitions with minimal rest to maximize calorie burn and metabolic boost.
Combine bicycle crunches with other dynamic exercises for maximum fat-burning potential. For additional calorie-burning strategies, exploring how many steps to burn 500 calories provides context for overall energy expenditure goals.
Strength and Muscle Building
For maximum strength and muscle development, focus on slower, controlled repetitions with added resistance. Perform 3-4 sets of 12-15 repetitions per side, emphasizing perfect form and maximum muscle tension throughout each set.
Consider adding weight or increasing time under tension to progressively overload your core muscles. The muscle-building approach requires adequate recovery between sessions, typically 48-72 hours between intense core training sessions.
Nutrition Support for Core Development
Proper nutrition supports your bicycle crunch training by providing energy for workouts and nutrients for muscle recovery. While you cannot spot-reduce fat through targeted exercises, combining bicycle crunches with appropriate nutrition creates optimal conditions for core development.
Protein intake supports muscle recovery and development following intense core training sessions. Carbohydrates provide energy for high-quality workout performance, while staying hydrated maintains exercise capacity and supports recovery between training sessions.
For comprehensive dietary guidance that supports your training goals, calisthenics diet chart provides detailed nutritional strategies for bodyweight training success.
Advanced Bicycle Crunch Techniques
Once you master basic bicycle crunches, these advanced techniques provide continued challenge and progression for experienced practitioners seeking greater core strength and definition.
Tempo Manipulation
Varying the speed of your bicycle crunches creates different training stimuli and challenges. Slow tempo increases time under tension for muscle building, while faster tempo improves power and conditioning.
Try the 3-1-1 tempo: 3 seconds to bring elbow to knee, 1-second hold, 1 second to switch sides. This approach maximizes muscle activation while improving movement control and coordination.
Resistance Progressions
Adding external resistance transforms bicycle crunches from bodyweight exercise to weighted movement for greater strength development. Start with light resistance and progress gradually as technique and strength improve.
Hold a 2-3 kg medicine ball or wear a weighted vest during bicycle crunches. The added resistance forces your core muscles to work harder while maintaining the same movement quality and range of motion.
Recovery and Injury Prevention
Proper recovery strategies ensure consistent progress while preventing overuse injuries common with intense core training. Your abdominal muscles require adequate rest and recovery like any other muscle group.
Allow 48-72 hours between intense bicycle crunch sessions to permit full muscle recovery and adaptation. Light movement and gentle stretching promote recovery without interfering with the training adaptation process.
For recovery techniques that support intense training, understanding what is foam rolling provides valuable tools for maintaining muscle health and preventing restrictions. For guidance on daily core training volume, how many crunches per day provides specific recommendations for sustainable progression and optimal results.
Conclusion
Learning how to do bicycle crunches properly provides an excellent foundation for core strength, stability, and athletic performance. This dynamic exercise challenges multiple muscle groups while improving coordination and burning calories effectively. Whether you’re a beginner learning basic movement patterns or an advanced practitioner seeking greater challenges, mastering how to do bicycle crunches enhances your overall fitness and functional strength. Focus on perfect form, controlled movement, and progressive overload to maximize results from this versatile and effective core exercise.
Combine bicycle crunches with complementary exercises like planks, squats, and pushing movements for balanced development. For complete program design, exploring full body calisthenics workout provides integrated training approaches.
Want to master the calisthenics handstand and take your skills to the next level? Whether you’re a beginner or pushing advanced skills, ISC – Indian School of Calisthenics offers expert guidance to help you master bodyweight training. Visit us at SRPF Ground, NH8, Goregaon (E), Mumbai – 400065. For class schedules, personalized coaching, or more details, call +91 77159 53218. Train smart, move better, and unlock your back strength with ISC.
How to Do Bicycle Crunches? – FAQs
How do you do bicycle crunches step by step?
Lie flat, hands behind head, lift shoulders, bring right elbow to left knee while extending right leg, then switch sides continuously.
What muscles do bicycle crunches work?
Bicycle crunches primarily target rectus abdominis, external and internal obliques, with secondary activation of hip flexors and transverse abdominis.
How many bicycle crunches should I do daily?
Beginners should do 2-3 sets of 10-15 per side, while advanced practitioners can perform 3-4 sets of 20-30 per side.
Are bicycle crunches better than regular crunches?
Yes, bicycle crunches engage more muscle groups including obliques and hip flexors, providing superior core activation and functional benefits.
Can bicycle crunches reduce belly fat?
Bicycle crunches build core muscle but cannot spot-reduce fat; combine with cardio and proper nutrition for overall fat loss.
How to breathe during bicycle crunches?
Exhale forcefully when bringing elbow to knee, inhale quickly during the transition between sides, maintaining steady rhythm throughout.
What are common bicycle crunch mistakes?
Common errors include pulling on neck, moving too fast, dropping shoulders between reps, and holding breath during exercise.
Can beginners do bicycle crunches?
Yes, but beginners should start slowly, focus on proper form, and may need to modify by keeping one leg stationary initially.
How long should I hold bicycle crunches?
Standard bicycle crunches involve continuous movement; for variations, hold elbow-to-knee position for 1-3 seconds before switching sides.
When should I do bicycle crunches in my workout?
Perform bicycle crunches at workout end as core finisher, or integrate into circuits for combined strength and cardiovascular benefits.