Overview of Close Grip Pull Ups
Close grip pull-ups are a calisthenics variation where your hands are placed closer than shoulder-width apart, emphasizing the biceps and inner back muscles. This compact grip shifts the load from the lats to the arms, offering a unique challenge for strength and muscle development.
What Are Close Grip Pull Ups?
Close grip pull ups involve gripping a pull-up bar with your hands positioned shoulder-width apart or even closer. This hand placement alters the dynamics of the exercise, placing more emphasis on specific muscle groups compared to wider grip pull-up variations. By executing this exercise, you can effectively engage your upper body, particularly your back and arms.
How They Differ from Traditional pull ups?
While traditional pull ups typically utilize a wider grip, narrow grip muscles worked situations create strength through narrower grip, which shifts the emphasis away from the lats and onto the biceps and upper back. This variation allows for greater bicep activation, making it a preferred choice for individuals looking to enhance their arm strength. Moreover, the compact hand position may reduce shoulder strain for some, making it a safer alternative for those with previous shoulder injuries.
How to choose the Best Calisthenics Pull-Up Bar?
Selecting the optimal pull-up bar for calisthenics training requires considering several factors beyond just durability. The ideal bar should offer multiple grip positions to accommodate various exercises, including close grip, wide grip, neutral grip, and potentially ring attachments. For home use, doorway bars with reinforced mounting systems that can support dynamic movements are excellent starting options. More advanced practitioners should consider wall-mounted or ceiling-mounted bars that allow for complete range of motion and higher weight capacity. Free-standing power towers provide versatility for those who cannot modify their living space. Regardless of type, ensure the bar has sufficient diameter (1.25″ is standard) for comfortable gripping and features a non-slip surface that maintains traction even with sweaty hands.
How to Perform Close Grip pull ups?
Supporting the narrow width pull-up muscles worked situation with proper form is essential for maximizing benefits and minimizing injury risk. Here’s a step-by-step breakdown:
Step-by-Step Instructions
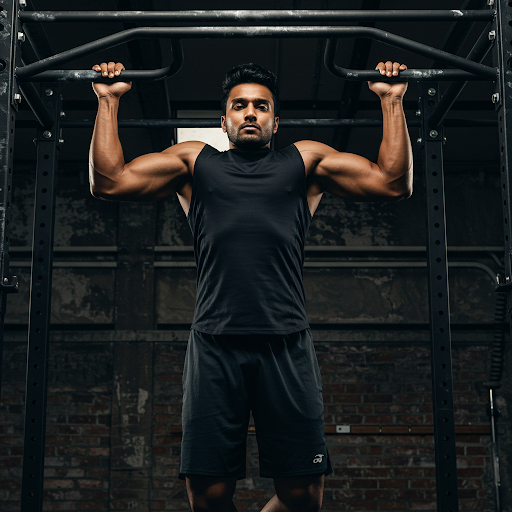
- Setup: Find a sturdy pull-up bar and grasp it with your palms facing away from you (pronated grip) at shoulder-width or closer. Ensure your grip is secure.
- Starting Position: Hang from the bar with your arms fully extended and feet off the ground. Engage your core and maintain a straight body line from head to heels.
- Pull-Up Motion: Begin the movement by pulling your shoulder blades down and back. Bend your elbows while keeping them close to your sides. Pull your chest towards the bar, aiming to bring your chin above the bar.
- Lowering Phase: After reaching the top position, slowly lower yourself back down to the starting position. Control the descent to maximize muscle engagement in making narrow hand placement muscles worked.
- Repetitions: Repeat the movement for the desired number, focusing on maintaining good form throughout.
Tips for Correct Posture:
- Keeping Elbows Tucked: Maintain close proximity of your elbows to your body throughout the movement to maximize engagement of the targeted muscles.
- Avoiding Momentum: Use controlled movements rather than swinging or using momentum to assist. This ensures that the muscles are doing the work.
- Maintaining a Neutral Head Position: Keep your head in a neutral position to avoid straining your neck. Focus your gaze slightly ahead of you rather than upwards in getting your bicep-focused pull-up muscles worked.
Which main muscles are used in close grip pull-up, especially when performed as part of a bicep-focused workout?
Understanding the muscles engaged during close grip pull up is crucial for optimizing your calisthenics biceps workout. This exercise primarily targets the following muscle groups:
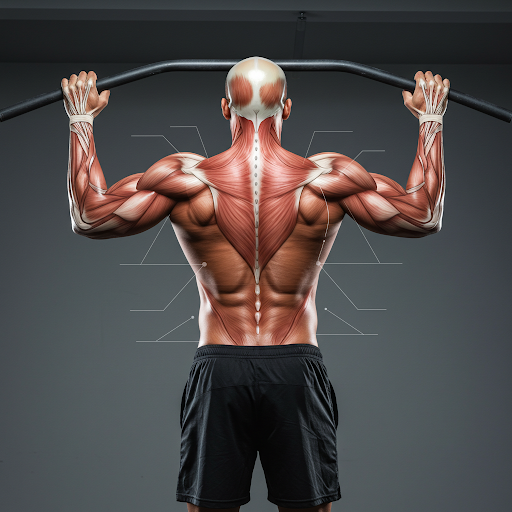
Primary Muscles Engaged
- Latissimus Dorsi: Often referred to as the “lats,” these large muscles are responsible for pulling your arms down and back. In close grip pull up, they play a significant role, though less so than in wider grip variations.
- Biceps Brachii: This muscle is heavily recruited during the pulling motion, making close grip pull up muscles worked conditions particularly effective for bicep development. The closer grip results in greater activation of the biceps compared to other pull-up styles.
- Rhomboids: These muscles, located between the shoulder blades, are vital for retracting the scapulae. They help stabilize the shoulder blades during the pull-up, contributing to overall upper back strength.
Secondary Muscles Involved
- Trapezius: The trapezius assists in stabilizing the shoulder blades and plays a supportive role during the exercise, especially in the upper back.
- Forearms: The forearm muscles are engaged throughout the movement to maintain a secure grip on the bar. Enhanced grip strength is a key benefit of performing close grip pull-ups.
- Shoulders (Deltoids): The deltoids help stabilize the shoulder joint and assist with the pulling motion, particularly during the upward phase of the exercise.
What are the benefits of Close Grip Pull Ups?

Incorporating close grip pull-ups into your workout regimen offers numerous advantages. Here are some of the key benefits:
1. Increased Upper Body and Grip Strength
This exercise variant effectively targets the upper body muscles, contributing to increased overall strength. By focusing on the biceps and upper back, this movement helps create a balanced physique while enhancing functional strength that can translate to other activities. Additionally, it improved your grip strength to perform different calisthenics exercises.
2. Enhanced Bicep Development
One of the standout benefits of narrow hand positioning muscles worked situations is their ability to maximize bicep activation. The closer grip encourages greater engagement of the biceps, making this technique an excellent choice for those looking to build arm muscle and improve definition.
3. Better Posture
Strengthening the upper body muscles through closely positioned hand pull-ups can help improve posture. By counteracting slouching and reinforcing the muscles that support the spine, this exercise contributes to a more upright and confident stance.
4. Reduced Shoulder Strain
The compact grip muscles worked position can alleviate some of the shoulder strain associated with wider grip pull ups. This makes the narrow variant a safer option for individuals with shoulder issues or those concerned about injury risk.
Variations and Alternatives for Close Grip Pull Ups.
To keep your training fresh and challenging, consider incorporating variations and alternatives to standard narrow-grip pulls:
1. Calisthenics Pull Exercise List
Beyond standard pull-ups, calisthenics offers a rich variety of pulling movements that develop strength across different planes of motion:
- Australian Pull-ups (Inverted Rows): Perfect for beginners developing initial pulling strength
- Scapular Pull-ups: Focuses on shoulder blade retraction, essential for proper pull-up mechanics
- Archer Pull-ups: Asymmetrical loading that develops unilateral strength
- L-sit Pull-ups: Combines core compression with upper body pulling
- Commando Pull-ups: Diagonal pulling pattern that emphasizes rotational stability
- Typewriter Pull-ups: Lateral movement across the bar that builds strength across the entire range
- Around-the-World Pull-ups: Circular movement pattern that challenges shoulder mobility and strength
- Muscle-ups: Advanced transition from pull-up to dip position
- Front Lever Rows: Horizontal body position that dramatically increases pulling resistance
- One-arm Pull-up Progressions: Ultimate unilateral strength developer
Each variation challenges your muscles differently, preventing adaptation plateaus and ensuring continued strength development. Progressive incorporation of these exercises creates a comprehensive pulling program that builds functional strength across all movement patterns.
2. Assisted Close Grip Pull-Ups
For those new to strength training or anyone looking to gradually build their upper body strength, assisted narrow-grip exercises are an excellent option. This variation allows you to perform the exercise with the support of either resistance bands or an assisted pull-up machine, making it easier to maintain proper form while targeting key muscles.
How Assisted Close Grip Pull Ups Work?
In this setup, resistance bands can be looped around the pull-up bar and then placed under your knees or feet. This support reduces the amount of body weight you need to lift, enabling you to focus on engaging the correct muscles. The primary shoulder-width pull-up muscles worked in this variation include:
- Biceps Brachii: The close grip significantly increases bicep activation, helping you build strength in your arms as you pull yourself up.
- Latissimus Dorsi: While the focus shifts slightly from the traditional pull-up, the lats still play a crucial role in the movement, assisting in pulling your body upward.
- Rhomboids: These muscles are responsible for retracting the shoulder blades, contributing to upper back strength and stability.
By incorporating assisted compact-grip exercises into your routine, you can progressively build the strength needed for unassisted pull-ups while minimizing the risk of injury. Over time, you can reduce the assistance from bands or the machine, allowing you to develop the necessary muscle strength and coordination.
Step-by-Step Process of Assisted Close Grip Pull Ups
Band Setup:
- Select a resistance band that reduces your bodyweight by approximately 30-40%. For most beginners, this will be a band with resistance between 30-50 pounds. The band should stretch significantly under your weight but not so much that it feels unstable.
- Drape the resistance band over the pull-up bar, centering it precisely in the middle. Pull one end through the other to create a secure loop. Test the band’s stability by pulling down firmly with both hands. The band should not slide or shift position.
- The hanging portion of the band should form a straight line down from the bar. If there are any twists in the band, straighten them out as they can affect the assistance and stability of the movement.
Execution:
- Step onto a platform and grasp the bar in the narrow hand placement position, hands 4-6 inches apart. Your arms should be fully straightened but not locked, creating a straight line from your hands to your shoulders.
- Place one bent knee into the resistance band’s loop, positioning it in the crease behind your knee. The band should feel snug but not uncomfortable. If using both feet, cross your ankles and place the band under both feet.
- Before beginning the pull, create total-body tension: engage your core at 30% maximum contraction, squeeze your glutes, and pull your shoulders down away from your ears approximately 2 inches.
- Initiate the movement by pulling your shoulder blades down and together. Imagine trying to push your elbows through your back pockets. This engages your lats properly before the pull begins.
- As you pull up, keep your elbows tracking straight down toward the ground. They should stay approximately 3-4 inches from your rib cage throughout the movement. Don’t let them flare out to the sides.
3. Weighted Close Grip Pull-Ups
Once you’ve established a solid foundation with the standard narrow-grip exercise, weighted compact-hand pulls can take your training to the next level. This variation adds an element of resistance, challenging your muscles further and promoting greater strength development.
How to Incorporate Weighted Close Grip Pull Ups?
To perform weighted narrow-grip training, you can use a weight belt that allows you to attach plates or a weighted vest for added resistance. The extra weight forces your compact position muscles worked, thus stimulating muscle growth and improving your overall strength.
The narrow hand placement muscles worked in this variation remain largely the same but are engaged more intensely due to the additional load:
- Biceps Brachii: The added resistance in limited-width grip muscles worked situation significantly increases the demand on your biceps, enhancing their size and strength.
- Latissimus Dorsi: The lats are heavily engaged as they work to lift the increased body weight, promoting hypertrophy and strength.
- Forearms: The grip strength required to hold onto the bar with added weight further develops the forearm muscles.
Incorporating weighted shoulder-width pulls into your workout routine not only boosts your strength but also prepares you for advanced movements and variations, fostering a sense of accomplishment and progression.
Step-by-Step Process of Weighted Close Grip Pull Ups
Equipment Setup:
- Select a dip belt with sturdy chains and carabiners rated for at least twice the weight you plan to use. Position the belt above your hip bones but below your rib cage, approximately at the level of your belly button.
- Thread the chain through the weight plate’s center hole, ensuring it passes through completely and hangs evenly on both sides. The plate should be centered when hanging, with equal chain length on both sides.
- Attach both chain ends to the belt using a carabiner rated for at least 200% of the total weight. Double-check that the carabiner gate faces toward you and is fully closed. The weight should hang directly between your legs.
Execution:
- Approach the bar and use the precise narrow hand position, placing hands exactly 4-6 inches apart. Your grip should be strong enough that you could theoretically hold it for at least 30 seconds in a dead hang.
- Before lifting your feet off the ground, engage your core muscles at 40% maximum contraction – significantly more than unweighted pulls due to the extra load. Pull your shoulders down away from your ears by approximately 2 inches.
- Maintain perfectly vertical forearms throughout the movement. If you draw a line from your elbows to your hands, it should form a 90-degree angle with the ground in both front and side views.
- Begin the pull by driving your elbows straight down toward the ground. Keep them approximately 4 inches from your rib cage throughout the entire movement. Your upper arms should form a mirror image on both sides of your torso.
- Pull continuously until your chin clears the bar by at least 1 inch. At the top, squeeze your shoulder blades together maximally while keeping your core engaged at 40% to stabilize the weight.
4. Negative Close Grip Pull-Ups
If you’re finding it challenging to perform full bicep-focused pull-up muscles worked situation, negative narrow-grip exercises offer an effective solution for building strength. This method focuses on the eccentric phase of the movement, which is critical for muscle development.
How Negative Close Grip Pull Ups Work?
To perform negative compact-grip muscles worked condition, start by using a step or jumping to the top position of the pull-up, where your chin is above the bar. From this position, slowly lower yourself down, taking around 3 to 5 seconds to reach the starting position. This slow descent is where the strength-building occurs, targeting various muscles in achieving shoulder-width pull muscles worked situations:
- Biceps Brachii: The biceps are heavily engaged as you lower your body, promoting strength gains and endurance.
- Latissimus Dorsi: As you descend, the lats work to control the movement, reinforcing their role in the pull-up exercise.
- Rhomboids and Trapezius: These upper back muscles help stabilize the shoulder blades during the lowering phase, enhancing back strength.
Negative narrow hand positioning exercises are particularly effective for beginners or anyone looking to increase their pull-up performance. By focusing on the lowering phase, you can strengthen the muscles involved and prepare your body for full pull-ups in due course.
Step-by-Step Process of Negative Close Grip Pull Ups
Starting Position:
- Stand 6-8 inches behind a sturdy pull-up bar that’s high enough to allow full arm extension when hanging. Ensure you have a stable platform or box behind you that brings your upper chest level with the bar height.
- Place your hands on the bar exactly 4-6 inches apart (measure this by placing one closed fist between your hands to gauge proper width). Your palms should face directly away from your face, with knuckles pointing toward the ceiling.
- Position your thumbs first, making sure they’re about 4-6 inches apart. This forms the base of your narrow-grip position. Then wrap your fingers over the bar, creating a full grip where your thumbs and fingers meet on the underside of the bar.
- Before jumping, engage your core muscles by drawing your navel in toward your spine about 20% of maximum contraction. This creates the necessary stability for the movement while still allowing proper breathing.
Execution:
- From your elevated position, bend your knees slightly and use a small jump to get your chin above the bar. As you jump, pull your elbows down toward your rib cage, keeping them close to your body throughout the entire movement.
- At the top position, squeeze your shoulder blades together as if trying to hold a pencil between them. Your chin should be well above the bar, and your chest should be nearly touching it. Hold this position for 2-3 seconds to establish complete control.
- Begin the lowering phase by very slowly releasing the shoulder blade squeeze. Count “one-thousand-one, one-thousand-two” and so on until you reach a five-count. Your arms should extend at an extremely slow, controlled pace.
- Maintain constant tension in your back muscles throughout the entire descent. You should feel your lats (the large muscles on the sides of your back) stretching gradually as you lower yourself.
- Keep your core engaged throughout the movement – imagine wearing a belt that you’re trying to make tighter using just your stomach muscles. This prevents any swinging or loss of control.
What is a perfect pull-up?
A perfect pull-up requires mastering specific technical elements throughout each phase of the movement:
Starting Position:
- Hand placement: Grip the bar slightly wider than shoulder-width (or closer for close-grip variations)
- Shoulder activation: Keep arms fully extended with shoulders actively pulled down away from ears
- Body alignment: Maintain a straight line from head to heels
- Core engagement: Activate core muscles at approximately 20% maximum contraction
- Body position: Hold a slight hollow body position throughout the exercise
Initiation Phase:
- First movement: Begin by depressing the scapulae (pulling shoulder blades downward)
- Muscle activation sequence: Generate tension in the latissimus dorsi before initiating elbow flexion
- Head position: Keep head in neutral alignment with the spine
- Elbow direction: Drive elbows straight down toward the floor rather than flaring backward
Ascent Phase:
- Movement path: Pull in a vertical plane without lateral swinging
- Elbow tracking: Keep elbows close to the torso throughout the entire pull
- Scapular action: Continue retracting shoulder blades as you rise toward the bar
- Movement tempo: Maintain controlled speed without relying on momentum
- Completion standard: Bring chin clearly above the bar (or chest to bar for advanced practitioners)
Top Position:
- Contraction quality: Hold a momentary pause with maximum muscle engagement
- Shoulder position: Keep shoulders actively depressed away from ears
- Scapular retraction: Maintain fully retracted shoulder blades at the top
- Core stability: Preserve the hollow body position with engaged core
Descent Phase:
- Lowering control: Perform a controlled 2-3 second eccentric phase
- Shoulder activity: Keep shoulders engaged and active throughout the entire lowering movement
- Range of motion: Return to complete arm extension without passive hanging
- Postural integrity: Maintain proper body alignment through the finish position
The hallmark of a perfect pull-up is complete technical precision—showing no compensatory movements, maintaining consistent tempo throughout, and demonstrating total control during the entire range of motion.
How do beginners do pull-ups?
Beginners should approach pull-ups through a systematic progression that builds the necessary strength gradually:
- Start with dead hangs – simply hanging from the bar develops grip strength and shoulder stability
- Progress to scapular depression – hang from the bar and practice pulling your shoulder blades down without bending your elbows
- Utilize negative pull-ups – jump to the top position and lower yourself slowly, focusing on controlling the descent
- Incorporate band-assisted pull-ups – resistance bands reduce effective bodyweight, allowing proper form development
- Practice Australian pull-ups (inverted rows) – these horizontal pulls develop the same muscle groups at a lower intensity
- Try jumping pull-ups – use leg power to assist the initial pull while gradually reducing assistance
- Implement isometric holds at different positions – holding at the top, middle, and bottom positions builds strength throughout the range of motion
- Focus on eccentric training – emphasize the lowering phase to develop strength that transfers to the concentric movement
- Use greasing-the-groove technique – perform multiple sub-maximal sets throughout the day to build neural efficiency
- Be patient – developing your first pull-up may take weeks or months depending on starting strength
Consistency is key – regular practice with proper progression will eventually lead to full unassisted pull-ups.
How to Increase Pull-Ups?
Systematically increasing your pull-up numbers requires strategic programming across multiple facets:
- Volume Accumulation: Implement sub-maximal sets throughout the week to increase total weekly volume without excessive fatigue. For example, if your maximum is 8 pull-ups, perform 10-12 sets of 4-5 reps spread across the week.
- Strength Development: Add weighted pull-ups once weekly, starting with 5-10% of bodyweight for 3-5 sets of 3-5 repetitions. Gradually increase weight while maintaining perfect form.
- Technical Efficiency: Film your pull-ups regularly to identify and correct inefficiencies in your movement pattern. Small improvements in technique can dramatically increase repetition capacity.
- Grip Endurance: Incorporate dead hangs at the end of workouts, aiming to increase time under tension by 5-10 seconds each week.
- Complementary Exercises: Strengthen supporting muscle groups with rows, lat pulldowns, and specific forearm work to address weaknesses in the kinetic chain.
- Frequency Manipulation: Experiment with both high-frequency approaches (daily practice with lower intensity) and lower-frequency protocols (2-3 intense sessions weekly) to determine your optimal response pattern.
- Periodization: Cycle through phases emphasizing different aspects – endurance (high reps, lower intensity), strength (lower reps, higher intensity), and power (explosive movements).
- Recovery Optimization: Ensure adequate sleep, nutrition, and active recovery to support adaptation. Pull-up performance is particularly sensitive to recovery status.
- Plateau-Breaking Techniques: Implement advanced methods like cluster sets, drop sets, or mechanical advantage variations when progress stalls.
- Mental Approach: Practice visualization techniques and develop specific cues that improve neural recruitment during pull-up performance.
Why is doing a perfect pull-up important?
Performing pull-ups with perfect form transcends aesthetic concerns and addresses several crucial aspects of physical development:
- Injury Prevention: Proper technique distributes stress appropriately across joints and tissues, reducing the risk of shoulder impingement, bicep tendonitis, and neck strain that commonly result from poor form.
- Maximum Muscle Activation: Perfect form ensures optimal recruitment of target muscles rather than allowing compensatory patterns that shift work to already dominant muscle groups.
- Movement Pattern Development: The neural pathways established during perfectly executed pull-ups transfer positively to other movements in both athletics and daily life.
- Progressive Overload: Only with standardized technique can you accurately measure progress and appropriately increase training difficulty.
- Joint Health: Proper scapular movement during pull-ups maintains shoulder joint integrity and contributes to better posture and reduced pain.
- Efficiency: Perfect technique allows more work with less energy expenditure, increasing potential training volume and adaptation.
- Long-term Development: Technical mastery creates the foundation upon which advanced variations and heavier loading can be safely built.
- Kinesthetic Awareness: Focusing on perfect execution develops greater body awareness that transfers to all physical activities.
- Neural Efficiency: Precise movement patterns enhance motor unit recruitment and coordination, ultimately allowing greater force production.
- Mental Discipline: The pursuit of perfect technique builds the mental focus and attention to detail that separates exceptional athletes from average ones.
When technique deteriorates, stop the set rather than accumulating repetitions with poor form that reinforce dysfunctional patterns.
What Are Close Grip Pull Ups 21s?
Narrow-grip pull 21s is an advanced training method that breaks down the exercise into three distinct phases, totalling 21 repetitions. The “21” comes from performing 7 reps in each of the three ranges of motion (7+7+7=21). This technique maximizes muscle tension, increases time under tension, and targets different strength curves within the movement.
Movement Breakdown
Phase 1: Bottom-Half Repetitions (First 7)
Starting Position Setup:
- Begin by standing directly under the pull-up bar, feet positioned shoulder-width apart for stability. When you reach up, your fingertips should barely touch the bar, ensuring proper height for full extension.
- Place your hands on the bar exactly 4-6 inches apart – measure this precisely by placing your fist between your hands to gauge width. Your knuckles should point directly at the ceiling, with thumbs fully wrapped around the bar for maximum security.
- Initiate a dead hang position by gently jumping or stepping off your platform. Your arms should be completely straight but not forcefully locked. Feel the stretch in your lats as you hang, creating a sensation of your shoulders being pulled down toward your hips.
- Engage your core muscles by imagining you’re preparing to take a punch to the stomach. This should be about 40% of your maximum core contraction – enough to stabilize your body but not so much that you can’t breathe normally.
Movement Execution:
- From the dead hang, initiate the pull by first depressing your shoulder blades downward. Think of pushing your shoulders away from your ears by about two inches. This activation should occur before any arm bending begins.
- Begin pulling upward with a focus on driving your elbows straight down toward the floor. Your elbows should stay approximately 3-4 inches away from your rib cage – any wider indicates improper form. Pull until your upper arms are exactly parallel to the ground.
- Control the descent back to the starting position over a 3-second count. Think “one-thousand-one, one-thousand-two, one-thousand-three” as you lower. Maintain constant tension in your lats throughout the lowering phase.
- Breathing pattern should be consistent: exhale as you pull up through the half-rep, inhale as you lower back down. Each breath should be controlled and deliberate, synced perfectly with the movement timing.
Phase 2: Top-Half Repetitions (Second 7)
Starting Position Requirements:
- Begin this phase immediately after completing the bottom-half reps. No rest period is allowed between phases. Your elbows should be bent at exactly 90 degrees, with upper arms parallel to the floor.
- Maintain the precise compact hand placement position established in phase one. Your hands should not have shifted at all from their original placement. Your knuckles should still be pointing directly at the ceiling.
- Keep your shoulder blades pulled together and down. Imagine holding a pencil between your shoulder blades to maintain this position. This creates the stable foundation needed for the top-half pulls.
Execution Details:
- From the midpoint position, initiate the pull by driving your elbows down and back. Imagine trying to touch your elbows together behind your back. This visualization helps maintain proper pulling mechanics.
- Pull continuously until your chin clears the bar by at least one inch. The bar should touch or nearly touch your upper chest at the completion of each rep. Your head position should be neutral, looking straight ahead or slightly down.
- Lower back down only to the midpoint position where your upper arms are parallel to the ground. Never drop below this position during phase two. Control this descent over a 2-second count while maintaining constant tension in your upper back muscles.
Phase 3: Full Range Repetitions (Final 7)
Complete Movement Instructions:
- Begin the final phase with no rest after completing the top-half reps. Start from a controlled dead hang position with arms fully extended. Your narrow-grip hand position should remain unchanged from the previous phases.
- Initiate each pull just as you did in phase one, by first depressing your shoulder blades. Then pull through the entire range of motion in one fluid movement. The pull should take 2 seconds from bottom to top.
- At the top position, your chin must clear the bar while maintaining strict form. Your chest should nearly touch the bar, and your shoulder blades should be maximally retracted (squeezed together).
Descent Control:
- Lower yourself with absolute control over a 3-second count. Break this down into segments: first segment (upper to middle) should take 1 second, second segment (middle to bottom) should take 2 seconds.
- Maintain constant tension throughout the lowering phase. Never let your shoulders shrug up toward your ears. Keep your core engaged at 40% maximum contraction to prevent swinging.
- Complete the descent until your arms are fully extended but not locked. You should feel a significant stretch in your lats at the bottom position, but never allow your shoulders to roll forward.
Body Position Maintenance:
- Throughout all seven reps, your body should remain in a slight hollow position. Think about pointing your toes slightly in front of you, keeping your legs together, and maintaining a slight forward lean of about 15 degrees.
- Your core engagement should remain consistent through all reps. The tension should be enough to prevent swinging but not so much that it restricts your breathing pattern.
- Fight against form breakdown despite increasing fatigue. Each rep should look identical to the first, even if this means taking slightly longer between reps on the final few repetitions.
Sample Workout Routine Incorporating Close Grip pull ups
To integrate narrow hand position pull muscles worked situations into your workout routine, consider the following sample plans for different skill levels:
Beginner Routine
- Assisted shoulder-width pulls: 3 sets of 5-8 reps
- Inverted Rows (Close Grip): 3 sets of 8-10 reps
- Plank Holds: 3 sets of 30 seconds
- Focus on building a solid foundation, emphasizing form and control.
Intermediate Routine
- Narrow-grip pull-ups: 4 sets of 6-10 reps
- Chin-Ups: 3 sets of 6-8 reps (to add variety)
- Bodyweight Rows (under a bar): 3 sets of 8-12 reps
- This routine helps establish proficiency and introduces varied pulling movements for creating compact hand placement muscles worked situations.
Advanced Routine
- Weighted shoulder-width pulls: 4 sets of 4-6 reps
- One-Arm Assisted pull ups: 3 sets of 3-5 reps per arm
- Commando pull ups: 3 sets of 5-8 reps
- For advanced athletes, this routine challenges strength and introduces complex movements.
Safety Precautions for Close Grip Pull Ups
Bar Inspection:
- Conduct a thorough visual inspection of the pull-up bar before every training session, looking for any signs of wear, rust, or structural compromise
- Apply gradual pressure to the bar at different angles to test for any wobble or instability – the bar should remain completely solid
- Verify all mounting brackets are secured tightly to the supporting structure, checking each bolt and connection point
- Test the bar’s stability by performing slow-weight transfers from side to side while maintaining narrow hand position
- Check the bar’s surface for any rough spots, burrs, or damage that could affect grip security
- Ensure the bar’s diameter is appropriate for proper grip (1-1.25 inches is standard)
- Verify there’s at least 18 inches of clearance on either side of your hand position
Environmental Safety:
- Clear a radius of at least 4 feet around your training area of any obstacles or equipment
- Ensure ceiling height allows for full extension plus 12 inches of safety clearance
- Position a sturdy platform or box nearby that can support your full body weight
- Check floor surface for any wetness or slippery conditions
- Install proper lighting to clearly see the bar and surrounding area
- Maintain room temperature between 65-75°F to ensure optimal grip conditions
- Position a mirror if possible to monitor form during training
Preparation and Warm-up Protocol
Cardiovascular Preparation:
- Begin with 5-10 minutes of progressive cardiovascular activity:
- 2 minutes light jogging in place
- 2 minutes arm circles (both directions)
- 2 minutes jumping jacks
- 2 minutes high knees
- 2 minutes dynamic shoulder rotations
Shoulder Mobility Sequence:
- Perform each movement for 30 seconds:
- Small to large arm circles forward
- Small to large arm circles backward
- Cross-body arm swings
- Behind-head shoulder stretches
- Scapular wall slides
- Band pull-aparts
- Face pulls with light resistance
- Shoulder dislocations with resistance band
Grip Preparation:
- Execute progressive grip warm-up:
- 30 seconds of finger flexor stretches
- 30 seconds of wrist rotations
- 30 seconds of rubber ball squeezes
- 15-second dead hangs with regular grip
- 15-second dead hangs with narrow grip position
- 5 scapular pulls from dead hang
- Gradual loading of full grip strength
Hand and Grip Safety Protocol
Maintaining proper hand and grip safety is crucial for effective and injury-free calisthenics close grip pull ups. A strong, secure grip protects your wrists and forearms while maximizing performance during each repetition.
Proper Grip Establishment:
- Measure hand spacing precisely using one fist width between thumbs
- Create a hook grip by:
- Wrapping fingers over bar first
- Fully encircling thumb around bar
- Ensuring thumb and fingers meet on same side
- Applying equal pressure across entire grip
- Position calluses properly beneath bar to prevent tearing
- Maintain straight wrist alignment throughout movement
- Monitor grip fatigue through “grip check tests” between sets
Grip Maintenance:
- Apply chalk when needed in thin, even layer
- Keep hands dry throughout training session
- Monitor for any hot spots or developing blisters
- Release grip fully between sets to restore blood flow
- Perform regular hand and forearm stretches
- Use pumice stone weekly for callus maintenance
- Monitor skin condition and address any tears immediately
Advanced Movement Safety
Mastering advanced movement safety techniques is essential to perform calisthenics close grip pull ups effectively and prevent injuries. Proper form, controlled motion, and mindful muscle engagement ensure you build strength safely and efficiently.
Form Checkpoints:
- Establish precise starting position:
- Shoulders fully depressed
- Scapulae slightly retracted
- Core engaged at 30% maximum
- Legs in controlled position
- Head neutral with eyes forward
Movement Pattern:
- Initiate pull by:
- Depressing shoulder blades down
- Engaging lats before elbow bend
- Maintaining vertical forearm position
- Controlling speed of ascent
- Keeping elbows tracking properly
Descent Control:
- Lower with precise technique:
- 3-second eccentric phase
- Maintain shoulder depression
- Control core position
- Keep forearms vertical
- Return to dead hang smoothly
Recovery Protocol
Effective recovery is crucial to maximize gains and avoid injury when practicing calisthenics close grip pull ups. Following a proper recovery protocol helps your muscles repair and prepares you for consistent, safe progress.
Inter-set Recovery:
- Rest periods should be precisely timed:
- Minimum 2 minutes between sets
- Maximum 5 minutes for heavy loads
- Perform light shoulder mobility during rest
- Monitor heart rate return to baseline
- Test grip recovery before next set
Long-term Recovery:
- Implement proper recovery strategies:
- 48 hours minimum between training sessions
- Regular mobility work
- Proper hydration protocols
- Adequate sleep (7-9 hours)
- Regular soft tissue maintenance
- Weekly deload when needed
Learn More About Close Grip Pull Ups
For complete mastery of close grip pull-ups, explore these additional resources and advanced concepts:
– Progressive Programming Models: Discover scientifically-designed progression systems that systematically build strength from beginner to advanced levels
– Biomechanical Analysis: Learn the precise joint angles and muscle activation patterns that optimize effectiveness
– Integration Strategies: Understand how to properly incorporate close grip pull-ups within a balanced training routine
– Specialized Variations: Explore less common modifications that address specific training goals or limitations
– Rehabilitation Applications: Discover how modified versions can be used during recovery from injuries
– Sport-Specific Adaptations: Learn how athletes from different disciplines modify the exercise for sport-specific carryover
Conclusion
Incorporating Calisthenics Close Grip pull ups into your fitness regimen is an excellent way to enhance upper body strength, particularly targeting the lats and biceps while engaging supporting muscles like the forearms and shoulders. The unique hand positioning not only boosts bicep activation but also reduces potential shoulder strain, making it a versatile option for all fitness levels.